
Monday, December 24, 2012


Sunday, December 23, 2012
A Geometry Lesson
 I wrote this post back in October, but never published it because I was unable to retrieve the video of Dusty.
 Belle opened up one of her pads Saturday while out playing, so I just had Dusty to run today. Last week I set up the "Backyard Dogs" exercises from Clean Run, June '11. I ran one or two a day, concentrating on giving timely turn signals to the dogs. This is the exercise that Dusty and I worked on today. I thought this exercise would be good for trying different handling options. One of those options was to lead out on Dusty's left and attempt a Ketschker at #3. He just wouldn't buy it and tried coming around the jump and running between me and the jump. (I accidentally deleted the video, and am trying to recover it.) Anyway, the long and the short of it is that whether I lead out on Dusty's right or his left or to the landing side of #3, he had a strong preference for turning right.

Today, I thought I could wrap Dusty to the left to avoid the off-course tunnel opening, and it wouldn't be that hard to accomplish. Saturday, I thought I could wrap Belle right at #11 with a post turn. In both cases, I failed to see the very basic fact that the dog's line of movement was most definitely favoring a turn in the opposite direction.
Long Time, No Write
I can't believe how long it's been since I last posted regarding agility. As some of you know, Belle has been experiencing slight lameness in her fore. I put away all the agility equipment except the hoops a couple of months ago, and switched to working Belle on the hoops just three or four times a week instead of daily. I've been keeping her busy mentally with more freestyle training. I decided to see if resting her made a difference, so I journeyed to the QCDC a couple of weeks ago for a JWW run thru.
I got carried away, and we ended up running the course three times, but Belle showed no lameness the next day!!!

 I wanted to share this section of the course with you. There is a decision to be made at the wingless bar in the lower left corner. Wrap right or wrap left? My decision (and that of most of the handlers) was to wrap right. However, a consequence of doing so was that the dog lands long after the winged jump and has an ugly line to the following jumps. Notice how much nicer the line is if the dog wraps left. One dog had a distinct preference for doing just that (much to the surprise of her handler).
On our second attempt, I wrapped Belle to the left, but she then back-jumped the wingless jump. Hmmm? Okay, let's analyze this. The dog will tend to wrap right because that is the lead she is on. A verbal cue to wrap left would cause her to change leads, as will the handler moving toward the left upright. Unfortunately, if the handler moves toward the left upright of the winged jump that follows too soon, she risks pulling her dog into a back-jump of the wingless jump.
Notice on the video that when Belle and I go back to try wrapping the wingless jump left the second time, her wrap is not very tight. But that is fine since she is still in a much better position after the winged jump to take the following two jumps.
I got carried away, and we ended up running the course three times, but Belle showed no lameness the next day!!!

 I wanted to share this section of the course with you. There is a decision to be made at the wingless bar in the lower left corner. Wrap right or wrap left? My decision (and that of most of the handlers) was to wrap right. However, a consequence of doing so was that the dog lands long after the winged jump and has an ugly line to the following jumps. Notice how much nicer the line is if the dog wraps left. One dog had a distinct preference for doing just that (much to the surprise of her handler).
On our second attempt, I wrapped Belle to the left, but she then back-jumped the wingless jump. Hmmm? Okay, let's analyze this. The dog will tend to wrap right because that is the lead she is on. A verbal cue to wrap left would cause her to change leads, as will the handler moving toward the left upright. Unfortunately, if the handler moves toward the left upright of the winged jump that follows too soon, she risks pulling her dog into a back-jump of the wingless jump.
Notice on the video that when Belle and I go back to try wrapping the wingless jump left the second time, her wrap is not very tight. But that is fine since she is still in a much better position after the winged jump to take the following two jumps.
Wednesday, October 31, 2012
Split Screen - A Quick How To
Several people have asked me how I do the split screen comparisons, so I thought I would post a simple tutorial for those who are interested.
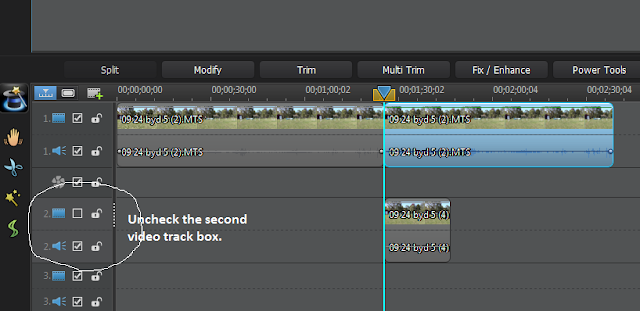
I use PowerDirector 10, but the general techniques should be applicable to any software editing software that provides two or more tracks for video. First prepare your video as you normally would in the first track. Load the clip you want to compare in the second track.

In the screen shot above, I have selected the clip in the top track to work with first. In order to make it easier to see the position changes I want to make with the top clip, I deselect the second video track.
 Notice there is a plus sign within a circle on the viewing screen in the first photo. (If you can't see it, double click on the photo for a larger image.) Place your cursor on the plus sign and move the clip toward the top of the frame.

Now to work on the second clip. Check the video box so that it reappears on your editing screen, and click on the clip itself so that you can move it.
 In the screen shot below, the video of the second clip is pretty much obscuring the top clip which I have already moved. Now all I have to do is place my cursor on the plus sign and drag the second track toward the bottom of the viewing screen.

And voila! You now have both video tracks visible on the same screen. Magnify the tracks and move the second clip right or left until you have a common starting point in the two clips.

 Here is a shot of the finished project. I have cropped the bottom clip and moved it so that Belle and Dusty are both just breaking the plane of the first jump.
I use PowerDirector 10, but the general techniques should be applicable to any software editing software that provides two or more tracks for video. First prepare your video as you normally would in the first track. Load the clip you want to compare in the second track.

In the screen shot above, I have selected the clip in the top track to work with first. In order to make it easier to see the position changes I want to make with the top clip, I deselect the second video track.
 Notice there is a plus sign within a circle on the viewing screen in the first photo. (If you can't see it, double click on the photo for a larger image.) Place your cursor on the plus sign and move the clip toward the top of the frame.
Now to work on the second clip. Check the video box so that it reappears on your editing screen, and click on the clip itself so that you can move it.


And voila! You now have both video tracks visible on the same screen. Magnify the tracks and move the second clip right or left until you have a common starting point in the two clips.

If you want to add a little more work to your project, you can crop the second clip to remove some of the sky. Unfortunately, in PD10 this isn't as easy as it could be since there is no pre-set template that allows for one step horizontal cropping. (Oddly enough, there are three templates for vertical cropping.) I don't know how easy it is to crop the view in other software, so I leave that for you to explore.

Subscribe to:
Posts (Atom)