Showing posts with label distance. Show all posts

Monday, May 23, 2016

Contact Practice and a Little More

Because contact equipment is so heavy, I absolutely hate setting up standard courses.  However, I did want to spend some training time this year on improving Willie's A frame and dog walk performances.  The other day, we ran a course that had two challenges we couldn't meet with my limited mobility.  The first challenge was AF to the tire, and the second was table to the weaves.  Here's a photo of the section of course in question.


The approach to the AF is from the left, and it is a fast approach from a chute.  I layered the jump and table and stopped between the table and the tire before releasing Will to the tire.  Despite out-stretched arm and foot, Will took the table.  The only way I could get him to take the tire was to actually take a step toward it as I released him, but I'd really like him to also be able to take it with a verbal and my static body cues.

The second problem was the weave poles after the table.  I wanted to layer the tire so I could get a head start on the DW which is off-screen to the right.  What I got was a lot of barking and spinning. I was really, really surprised by this, since I thought Willie's weave entrances were pretty much rock solid.  Apparently, this is a little varation we will have to work on.

I designed this course for working on these two issues, plus our contact performances.


I ended up adding a couple of jumps so that we could go from AF to DW.  The teeter is rather a dead end, but since its not really as big a problem for us as the DW and AF, I'm okay with that.  I suppose if the teeter were a bigger issue, I could put it where the AF is on this course.  Here's one sequence we ran this morning.

Saturday, July 6, 2013

Distance Handling and Obstacle Committment

Bud Houston posted this sequence the other day, and I thought I would give it a whirl and see how well Belle and I could do this with distance handling.

The handling problem I encountered failing to wait for Belle to commit to the current obstacle before I moving on to what was coming next.  In particular, Belle's line from 3 to 4 is not a given--I have to maintain pressure on her line until she is committed to that jump which for her was when she was in the air.  If I turned too soon, she pulled off the jump in confusion.  The other thing I had to remember was to not under-handle the wingless jump.  At the very least I had to keep my arm out and look at it while moving toward 6.

However, if I encountered a sequence like this in a trial setting, I would not opt to stay out of the pocket.  I would support Belle to 4 and start moving laterally to the left wing of 6 and do a FC as in the video.  If the course called for me to be on the right side of the teeter, then I would add a blind cross between 6 and the teeter.
 

Saturday, September 24, 2011

Distance Training - 09/23/11

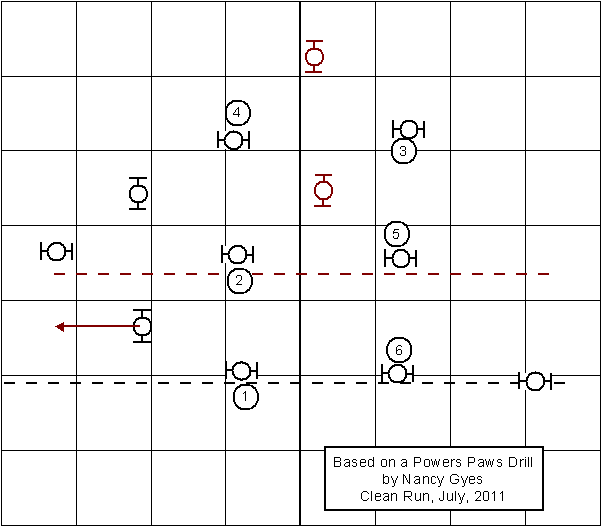
I set up Nancy Gyes' Power Paws Drill from the July issue of Clean Run.  My goal is to run the exercises from bonus line distance.  So far it's not going that well, but it is a great training opportunity for Belle, Dusty and me.  Here's the course as I set it up with hoops:


I added the two red hoops to make the exercise easier from behind the bonus lines.  I hope to eventually be able to remove the two hoops, but as you can see in the video, they are quite useful for improving the handler's timing and it makes the course more straightforward for the dog.  Belle was drawn to the hoop on the left with the red arrow, and I eventually moved it out a good 20 feet so that it was no longer in the picture.

This brings to mind a couple of guidelines for distance training:
  • Don't mark mistakes.  You want your dog to be comfortable working away from you.  Corrections will erode that comfort. 
  • If an exercise is not going as you hoped, simplify the exercise so that you and your dog can be successful.

After running the course, I decided to alter it so that I could concentrate increasing Belle's send speed.  Here is the course as I will be using it tomorrow, along with a couple of suggested sequences:

If need be, I will configure the outer two lines of hoops to form arcs to encourage more speed on the send.


Sunday, January 30, 2011

A Cool Way to Work on Distance Indoors

I've been working with Belle on the basics of Treibball, and every few days, I do a youtube search for any new videos related to this new canine sport.  This morning I found this one which is also applicable to teaching a dog to work at a distance.

I don't understand German, but I assume the lady in the video is working on teaching her dog "away" and "come bye."  I've worked on lunging the dogs in a large circle outdoors and on sending them around trees, but I think the visual perimeter that the small cones provide would be a great aide in introducing and/or reinforcing the concepts of "away" and "come bye."

Additionally, for general distance work they provide a clearly defined line that the dog is to stay beyond.  You would begin with the cones forming a circle of perhaps ten feet in diameter and then expand it as your dog gets comfortable working at that distance.  The only thing I would do differently is throw the treat or toy outside the circle the majority of the time to reinforce how much fun it can be to work away from the handler.


Tuesday, January 11, 2011

Distance - The Basics

I am frequently asked how to train a dog to work at a distance.  The basic answer is that you start by adding one foot of distance at a time.  If that is too much, you try adding six inches at a time.  In order to do agility at a distance, your dog has to be able to do all the obstacles without help from you.  Independent weaves and contacts are a must.  However, you can work on creating distance using just jumps and tunnels.  In fact, you can start training distance before you teach any obstacles.

I use a clicker for shaping some behaviors, especially when working with a puppy or a dog who has had no real training.  A clicker is not a magic wand; it is simply a unique way of saying "you have done well and I'm going to give you a cookie."  Later I substitute "yes" and use it as a marker, reward and encouragement--definitely not something advocated by clicker purists.  Both Belle and Libby learned to skateboard purely through shaping.

In December, 2009, I had a rescue staying at my house who was a learning sponge.  I made a video of shaping her to go out to a mat.  This is an excellent first step for accustoming your dog to moving away from you.  Once your dog can go to the mat on command, you can tell them to sit, down, wave or do whatever tricks you have taught.  Gradually increase how far you and your dog are from the mat before the send.  Ultimately, you can send them 50 feet or more to the mat, down them, toss a ball and then release them to retrieve the ball.  Voila, your dog is working at a distance.

Here is the video of Sammy Jo's introduction to mat work.  Sammy already knows that offering behaviors can earn a click and a treat.  I start off quite close to the mat in order to make it easy for her to succeed,  and of the cookies are delivered on the mat.  However, I throw some of the treats on the floor so that she has to move away from the mat.  I also change which side of the mat I'm standing on.  Sammy doesn't quite know what I want at the end of the session, but within another session or two, she was making a beeline for the mat.


This video by Nancy Tanner demonstrates how you can send your dog to the mat at a greater distance and have them do a trick and then reward, making distance work fun, fun, fun.

Monday, January 10, 2011

The Devil is In the Details - Especially at a Distance

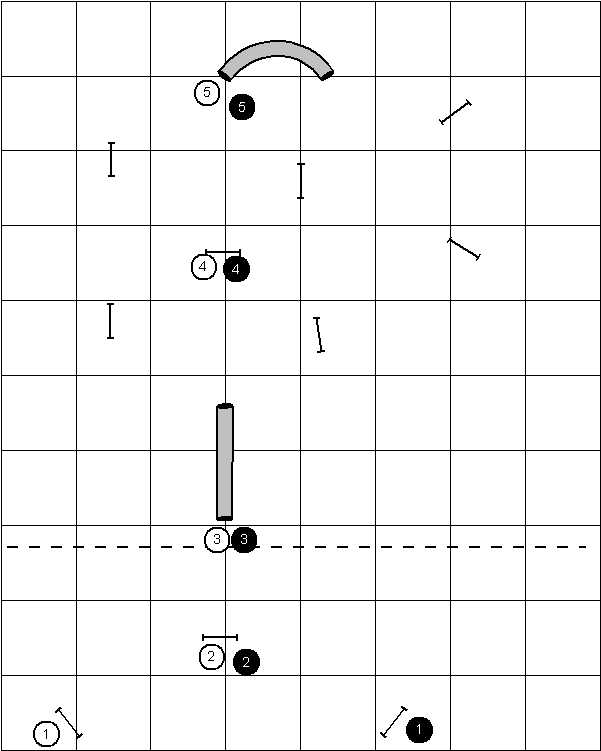
It was warm enough to bring a short tunnel out of storage and set up the course I posted yesterday.  I had hoped to work on a bunch of different sequences, but I quickly discovered that getting Belle to run to the second tunnel using the numbers in the white circles was not that easy.  

The problem turned out to be my mistaken belief that standing parallel to Belle's path from #3 to #4 was the way to go.  Some of the runs were successful, but certainly there has to be a way to be more consistent.  I confess I was unable to spot the problem in the video I shot (mostly because I used a tripod and I'm so far away from the camera).  I figured out what I was doing wrong by accident when we later in the afternoon to try again.

Because of the constraint of the bonus line, I was stopping while Belle was in tunnel #3 or shortly after she exited.  This is something that happens when you are sending your dog 50 feet or more away from you.  Sooner or later you run out of real estate.  Coming smoothly and gradually to a stop after Belle exits the first tunnel is probably the best plan, but it's not always easy to execute.  In training, I'm trying to get Belle to realize that I want her to go on when I come to a stop with my feet in a wide stride, my hand out-stretched and my voice cuing her to continue.   What I failed to realize was that standing parallel to the path I wanted her to take wasn't supporting her line to the second tunnel.  Without that subtle pressure on her line, Belle had to guess what I wanted.  Since a dog tends to turn in toward her handler, much of the time, she turns left.  Even when she took the second tunnel, you can see she slows down and looks back at me.


Since getting to the second tunnel turned out to be difficult, I should have rewarded Belle upon exiting the tunnel when she made the right choice.  When we went out a second time, later in the afternoon, I made sure to reward the correct choice by tossing her ball for her as she exited the tunnel.  Hopefully, we'll be able to go out tomorrow and work on this some more.

I also took Dusty out to work.  We concentrated on the dark circle sequence, beginning at the straight tunnel.  Once he was successful with that, we backed up to the second jump and then to the first.  For Dusty, the bonus line was at the exit of the first tunnel.

Friday, October 1, 2010

Follow-Up on JSM Distance Exercise

I've been working on the distance exercises from Ms Simmons-Moake's May, 2008 article for several days now, and I've learned a lot.
 
Pushing out to #7 works about 2/3's of the time for Belle and me.

Going from #7 to #8 requires a verbal "wrap" from me as well as signaling the turn to #8 as soon as Belle has committed to #7 is not enough.  It requires a verbal "wrap" or it's either not going to happen or it's going to be a very wide turn.

I can't take #9 for granted even though it's close to me.

Belle responds nicely to the drop of my arm and turn of my body to take the inside jump after #4.

Sunday, September 19, 2010

May the Force be With You

Click on Course Map to Enlarge
My plan this morning was to run out and have Belle do a fast loop around the agility course I set up last week while I stayed behind the 20-point bonus line.  Should have been a piece of cake, but I failed to move far enough laterally to indicate that I wanted Belle to take jump #6 after she exited the tunnel (red handler). I decided that this would be a good opportunity to demonstrate the interaction of angles and distance.  Hoping to capture Belle's point of view of my handling, I set up the video camera two feet above the ground pointing toward me. The first clip shows what happens when I try to handle the tunnel to #6 from the red handler's position.  In the second clip, I demonstrate that at normal layering distance, I can be even more to Belle's left as she exits the tunnel and still put enough pressure on her line that she takes the correct jump.  (You'll notice there is a little loop in her line, but nothing drastic.) In the third and fourth clips, I'm handling from the 20-point bonus line.  To help you see what Belle sees coming out of the tunnel I have inserted two frame shots at the end of the video--one from each clip.  If you pause the video for each shot you can see how much the line extending from Belle to me changes the further I am to Belle's right.  I also inserted a frame shot in the first clip which shows how the line from Belle to me draws her to the off-course jump. I played around with the course map and came up with this visual explanation of why the red handler's position doesn't work. Yet for normal layering I can be even further to Belle's left and still direct her to #6 successfully.
This may or may not be a valid analogy, but to me it seems that the black triangle is more tangible or powerful "forcefield" than the red.  The length of the red triangle weakens the pressure being applied to the dog's line.  Even worse, the red forcefield brings the dog's attention to a very viable off-course line.  At normal layering distance, the black triangle shows more pressure being brought to bear on the correct line.  Additionally, only one off-course obstacle is within the black forcefield.  Actually, if the handler moves a little more to the dog's left, an even stronger push to #6 is created.  If you'd like to play with this effect, load the info below into your Course Designer 3.  You can manipulate the triangles just like you would any obstacle.
Begin Course Designer Version 3 For a free viewer, go to www.coursedesigner.com/viewer AAJheJxF0W9Ik0EcB/Dv77nN9LGmQwwXm7cXmkEWlC2NlGSYiEVEFqFSIGyE1Bw8 W0S+kt4LKSq9DITeRQRp5AvZ6zDKFwtMQs0QqZhzmT3V9lz3+Nzw7sXd5773jztG npH6x01QhQiyksagAxqIMYrw8d+xi2+WFqoQKtd6mOejrvHbFAE2Kj9U9+QGCw1y YSeNLs3stmuQkeR49VwtD34Lb34te5V/JiZr+pES4B47Gz70vca/cmF52z8lpJka 7nYtn0yvHFtcPBKFM2wQejHDOuoOZgF+neSFxrzHC6UHhHAbnz+tbYjz1q5otkzZ rotOy56SF/2+OveIPaV1PSReUlJs0VvxgsawAI24yz5qOlBVtio7jmYxqhfVi3qz 7V9RYaRzEztFHUbjn6mS/XWx8lbsaxiGs2e7rQc/vb4daiRb78SW9z0rimFWT+X3 JJ+wD5tfannmqXuVuG5z23/L1eKa0Pi8/R2meF1BOBVwdELr+kU4rZQqhLOEJqVr okJmZ5Sm810mIaTkz2bkQ59VmjOflBCalfosq5TQovQcYR/hXIBfBSZFovJvOgL+ CJcyok3cONp9P5EMdsSjiaGGZPBm3LgbAO3l+CHmieWuxI3YwL3g5YGHUWNw6I6T /gfbbrA4 End Course Designer
The next time you run, may the force be with you.